Task 1: GPS Logging with PLX-DAQ
 |
| Failed Attempt (1). No Coordinates Shown |
 |
| Failed Attempt (2). Latitude and Longitude are in the wrong column |
Even thought the columns are wrong, the GPS Coordinates are already correct. Thus, we decided to be more ambitious and added in the distance calculation as well!
After many failed attempts, we finally got the GPS coordinates as well as the distance (or rather displacement) calculation to be displayed and logged on PLX-DAQ.
 |
| Testing @ Stadium along the track |
The distance calculation is rather accurate as tested at the running tracks. However, if we want to calculate distance traveled, a more accurate way would to calculate via speed of car.
Task 2: Data Transmission with PLX-DAQ
Previously, we tested out the range of transmission of our modem. However, the source of the info transmitted is from our computer directly. For Sunspec 4, we are using the Arduino Mega to collect all the info and transmit it out. So how do we connect the Arduino to the modem?
 |
| Connection at the Transmission End |
 |
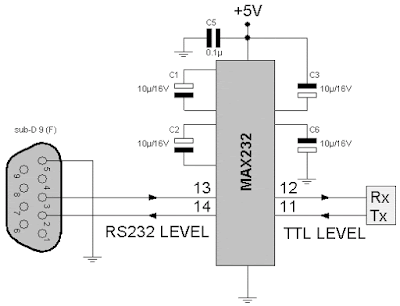
| Schematic Diagram for Max232 Chip |
We connected the arduino to the modem using an Max232 board. There will be 2 tracks : tranceiver and receiver. Half of the both tracks are connected to the modem and the other half to the Arduino, both tracks going in opposite directions.
 |
| Connection of receiving end |
 |
| Data received by PLX-DAQ |
The modem on the receiving end can be connected to the laptop directly. Data can be logged through the PLX-DAQ software just by changing the port number to the port number of the modem.